Showing posts with label industrial arts. Show all posts

Monday, September 5, 2016

Wood Slice Wreath


We're on a roll here with these wood slice projects, this time a wreath. Again super simple and inexpensive.  

The wreath. For the base of the wreath have about 12-15 slices of wood roughly the same size.  My base slices were about 4 inches across so how many you need will depend on how large you want your wreath and how big they are.  Lay them out on the table in a circle arranged so that they have the most surface edge touching.  Hot glue the pieces where they touch and this is the base of the wreath.  By itself it will not be sturdy enough, this is where the smaller slices come in.  Lay them over the middle of two of the base layer slices and glue the heck out of them.  Do this all the way around and there is no way this wreath is coming apart.  Keep adding slices to add depth and dimension.  

The bow.  Making a perfect bow is difficult at best, especially if you are working with a stiff material like burlap.  For this reason I don't even try and no one will know the difference.  The bow on this wreath is made of four pieces.  Two for the loops and two for the streamers that hang down.  Hot glue is again your friend for making this look like it is the perfectly tied bow. The hot glue also insures that this bow isn't going anywhere.  Add an adornment and it's done.

The cost. Others of these I have seen made had a store bought base. I skipped that part for two reasons.  First, I would have to wait to make this until I had a chance to go into town and I'm not even sure where you buy such a thing so I would have to go looking around.  And second, it would add to an already heavy project.  Unless you know you are hanging this where there is a stud in your wall, over time it will make a large hole in dry wall.  Also it needs more than a picture frame nail to hang it up. The slices Dad cut for me from downed branches in the yard.  I have seen these slices in craft stores for an insane amount of money.  If you don't have a table saw to cut your own, do some networking in your neighborhood, someone must have some sort of saw that will cut these for you. Bring them some fresh baked cookies if they seem hesitant.  The pine cones I had in the craft closet that I picked one day when we were geocaching, so free.  The ribbon I got on clearance at Walmart.  It wasn't the right size so I had to cut it. Don't let the wrong size ribbon keep you from a good deal.  The ribbon was $1.50 and I used about a quarter of it making the final cost of the wreath 37 cents plus however much hot glue you use. 
  
  
We made a bunch of these for a church festival and added fake flowers and ribbon.  This made them a little more expensive, but not by much as we were able to use store coupons.  This one we added a couple painted wood pumpkins and a couple of spiders Dancer made.

Monday, April 13, 2015

Redoing Furniture


Spark and I found this rocking chair for just $20!


We bought some Country White paint and started painting.  This picture is really white, not blue.  It reminded of the blue and black or white or gold dress.


Lots of coats later, every time the sun shined on it we could see parts that weren't adequately covered, we have this beautiful chair.  


We also found an end table that Spark painted a moss green.  We brought this to Grandmas new home and didn't get an end result picture but we were very happy with how it turned out.  It is amazing what a little paint can do.

Wednesday, April 10, 2013

4-H Project Day

Last Sunday was our yearly club project day.  It is a day where each family takes topics and does a little talk and has the kids do a project in that area.  The kids in our club range from 5th to 12th grade making it easier to do more complex projects.  This year we:
 

Made bread in a bag.  The kids loved, loved, loved this.  Most of them were eating their bread from the top down as they were leaving.  We even got one phone call that night saying how good that bread was.  Seems no one bakes bread any more and know how yummy good it is.  Hopefully a couple of them will be inclined to start now.


Canned pickle relish.   Only one other family had ever canned anything.  Seems we are in 4-H with a bunch of yuppies that need to be countrified.

 
 Cute memo boards.  A frame, chicken wire stapled to the back, a piece of fabric on cardboard hot glued to the back of that and clothes pins and buttons hot glued to the front.  This one is Sparks.
 
 
Dancer's, her fabric is much cuter than this picture shows.   
 
 
Painted flower pots and planted flowers. 
 
 
Made plant starters out of toilet paper rolls and planted seeds.
 
 
Fire pokers.  This was a length of rebar spray painted black,

 
with a wooden handle that was burned and then they could use a wood burning tool to put their name or whatever they fancied on it.  We tried it out with our first bonfire of the year. 
 
 
Kacheekers was very pleased that we were outside.  He is a lap cat and he doesn't get much attention all winter so this made him happy, happy, happy.

Tuesday, August 14, 2012

Outside Family Fun

Every year several environment groups (County Soil & Water Conservation District, DNR, County Parks, a university, local sportsman's clubs, businesses and others), get together and offer a free hands on day at a park.  This was the first year we had gone and now we wished we had known about it in previous years.


There were a few make it and take it activities.   

The pieces were all precut so all we had to do was screw it together.  Dancer loves to use the nail gun for any project she does but, in this setting the screws were probably safer.

We should have at least two happy birds in our yard next year.

They got to try archery, Dancer's second time but this was Spark's first.

They guy helping Spark said, "He shoots a gun doesn't he?"  I guess archery aiming is different that aiming a gun.  They only got to try six arrows.  The guy said to get back in line and they could do more but, the line was quite long and we didn't want to wait and miss the other activities.


Along the Mississippi, this looked like a movie set to me.  The perfect setting for a sword fight.


This vine reminded us of those cut out board where you put your face in.  Glad I was the one taking the picture because both Spark and Dad spent a lot time after this scratching their legs.  There wasn't any poison ivy or burn weed so not sure what those plants were, either way Dad and Spark are both highly allergic to them.

A pontoon tour to learn about bank erosion. 

We got a bonus on our tour, a mother deer and two fawns.  Almost every time we are in the car at least one deer runs in front of us, no different when we are on the water.

We got a second pontoon ride to learn about electrofishing.  The first part of the demonstration going along the river follow this stunboat.  The booms in the front are the electrodes that stun the fish for up to two minutes.  Those two guys watched for fish and then scooped up different fish species.  It was amazing how many fish they got and how many more were jumping in the water.  Now, if we were on the side of the river fishing we would be lucky to get a few little ones.  On a side note, there was a booth set up to test if you knew how many fish of each kind was the legal limit.  I told the lady how funny that was because we have never had to worry about such a problem.  She also asked how many Northerns you can have over 30 inches.  I told her if I caught Northern that was 30 inches I would probably get it mounted not eat it.  Actually, when we fish we usually don't keep the fish because all the lakes have recommendations on how often you should eat out of them.  The Mississippi is no more than once a month.  Um, no thanks, we will go with the recommendation of never.  We are pretty close to the start of the river and I wouldn't even swim it much less eat from it. 

After they were done with the electrofishing demonstration, the two pontoons pulled up to each side of the boat and they went went through all the fish in their live well. 


We also learned the proper way to measure fish, again, never had a fish that was worth measuring but, who knows, maybe some day that information will come in handy.  We can hope anyway.  This is one of the main reasons we went to this event because this would be Dancer's dream job and she wanted to see the demonstration.


At all the booths and activities all the kids under 12 got a ticket.  When they collected six tickets they could turn them in for a prize.  When we got up the booth that had the prizes they had a wheel that you spun to see what prize you got.  As we were walking up a kid was walking away with a duck call but the table was full of bag of chips.  I thought it would be cool to win a duck call but it would be great, since we were hungry at this point and the next thing we were going to do was eat lunch, if Spark would win a bag of chips to go with this sandwich.  I figured the rest of the prizes would be bouncy balls or some other little plastic trinket.  Spark got up there and spun the wheel and it landed on backpack.  I thought, and he said later that he thought too, that it would be one of those nylon bags with the drawstring top.  No, it was a full size canvas backpack.  They had tons of other great prizes too.  Very generous on the part of the sportsman club that donated all those prizes and then manned a both all day to give them away.


On the way to the car for lunch we saw why unicorns are extinct. 


We pulled out our lunch and lawn chairs and pretty soon a lot of other people started to do the same thing.  It was a long way to the picnic area and they must have thought the same thing and if those crazy people are doing it, we will too.


There was a program called "Wild Animals Everybody Loves To Hate."  The point was to tell us that these animals are really not what people think they are.  That was all well and good until the presenter said, "But don't get any closer than four feet to the porcupine, we don't want to agitate him." 


This was station about water and one of the activities was making huge bubbles.  Here I just happen to catch a bubble right as it was breaking.  When they broke it was so fast that you never saw this so it was cool that the camera caught it.

The event was six hours long and it took us five hours to look at everything.  Good return on our entry fee of $0.00.  We are already looking forward to next year.

Monday, July 16, 2012

A Nest Of Crickets

Crickets are stacking workshop stools.  They can be used as small workbenches, for standing and sitting on, or you could even eat your lunch on one, the sky is the limit.  The directions for these are at the bottom of this page. 


Dancer made these with the help of Dad and Grandpa Jerry for a 4-H wood project.  I love that now these stools have the memories of being trigenerational.


All stacked together.  She is going to paint them, now just to decide what color, she is leaning towards purple. 


Before the great cricket project, Dad cooked us burgers on the grill.  Spark, Grandma Pat and Mom are patiently waiting for the tasty delights.

Sunday, April 15, 2012

Scroll Saw Pig Puzzle

This afternoon was our 4-H club's project day.  We started with a potluck lunch and our monthly meeting.
 

After wrapping up the meeting parents gave talks on different projects.  One dad brought his scroll saw and let the kids cut out shapes and cutting them into puzzles.


Spark's pig.  He really enjoyed this and came home all excited about using the saw.  We have one stuck way in the back of the garage Dad is going to have to haul out and help him make some more projects. Dad enjoyed woodworking before we had kids but their arrival sort of put a halt to a lot of our hobbies, now they can enjoy it together :)

Wednesday, March 28, 2012

How To Replace and/or Install A Toilet

Spark's grandpa is having knee replacement surgery and wanted a taller toilet.  They actually had an abnormally short toilet at the place they just bought.  "Curse you tiny toilet!!!"  We volunteered to swap the toilet out for them. 

The important first step not shown here is to turn off the water supply from the wall, otherwise you will be sponging for eternity.


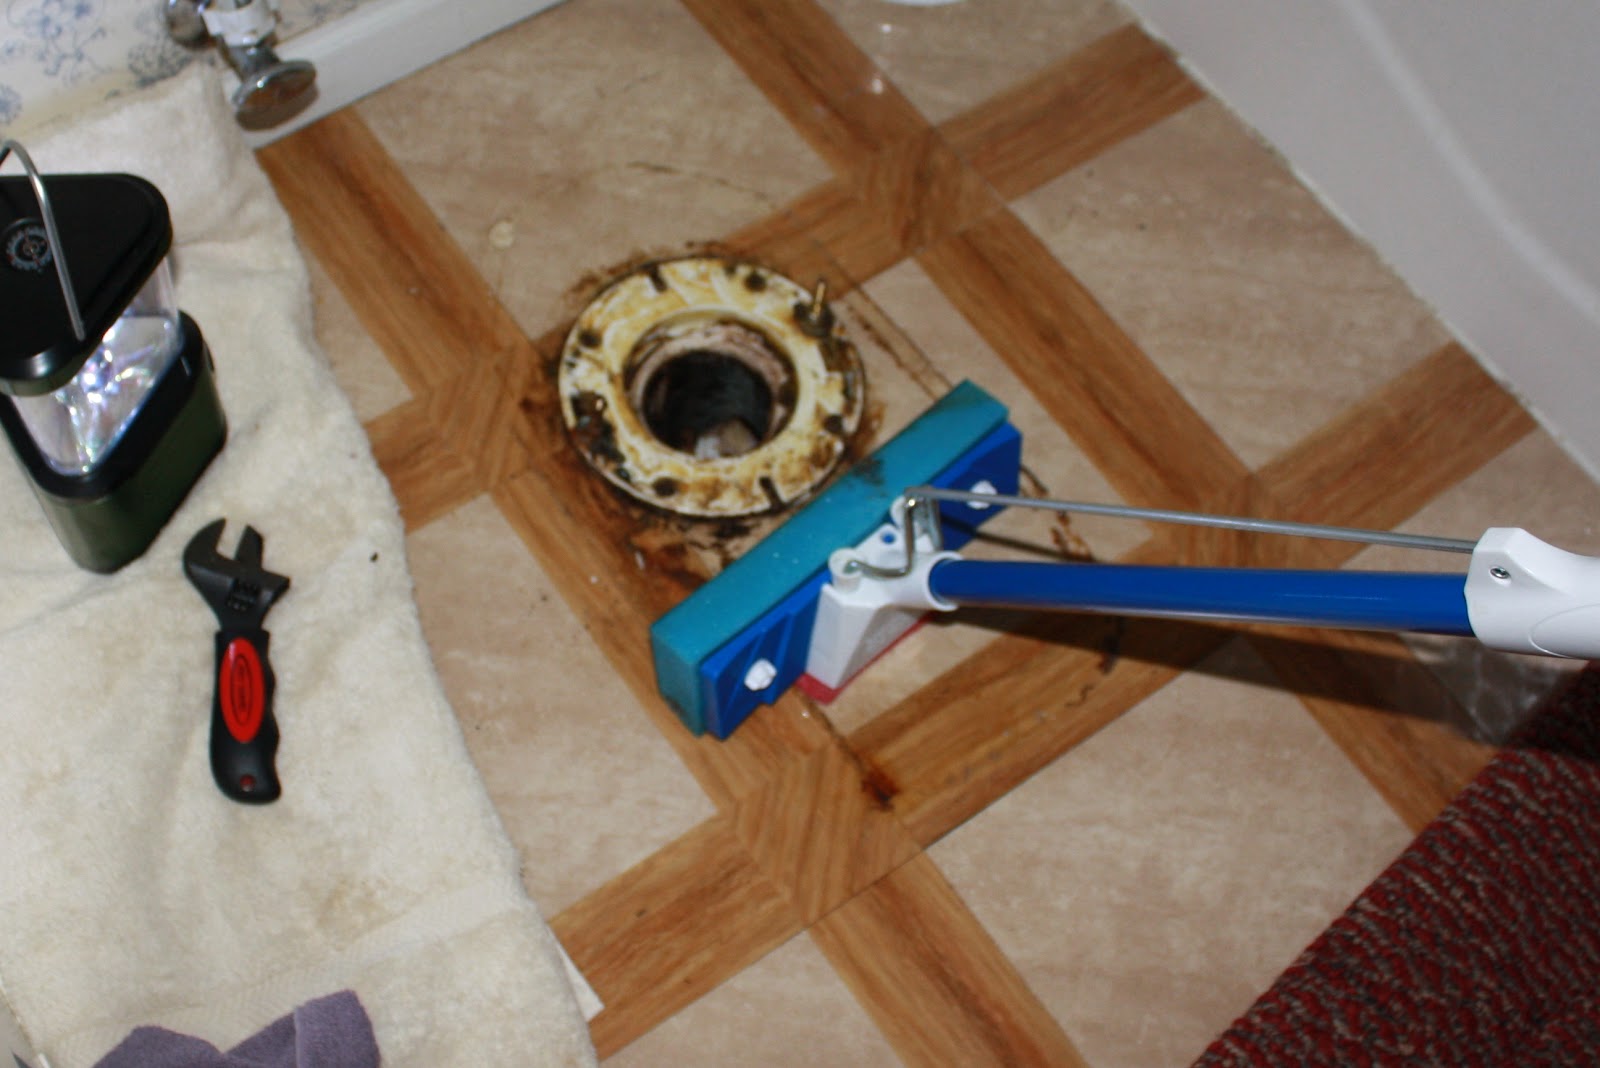
After the water is off, flush the toilet to empty the tank.  The tank still has water in it, so soak it up with a sponge.  This takes a while, but you have to carry the old toilet out through the house so do a good job.

The tank is held onto the toilet with a couple of bolts.  Unscrew the nuts under the tank and lift it off, you can see why it needs to be empty.

The toilet still has some water in it so sponge more out of the hole where the tank was.


There is a bolt on each side of the toilet to fasten it to the floor.  Unscrew these and lift the toilet off.


Under the old toilet there is a yucky wax ring.  You will need to scrape this wax off and use a new wax ring.  It is really sticky, use a putty knife or blade screw driver.  You are doing this over the waste pipe so it may not smell like spring flowers.  It looks gross but so does the new wax ring.


The floor under a toilet is usually pretty dirty from years of condensation in the summer humidity, mop it before you continue.

Here Spark is taking off the water supply from the wall and putting on a news water supply.  The new toilet is taller so the old supply line won't reach.  If it would reach you can skip this step, or you can get a new one anyway.  They only cost a couple dollars and new ones are made with a stainless steel mesh that won't burst.  It is also easier to change now with the toilet out of the way. 


Taking the new toilet out of the box, it's heavy!

Put the new wax ring on the toilet, not on the floor drain.  You can see it looks gross even when new.  You will need to press it firmly onto the toilet, when you flip the toilet over to install it needs to stay in place.   Set the toilet onto the bolts sticking up from the drain.  The plastic flange in the wax ring points downward into the drain pipe.  We used the old bolts, they were in good shape.  The toilet comes with new bolts if you need to swap them.   Push the toilet on straight down, don't rock it back and forth!!   You really, really want it to have a good seal.

Apply new nuts onto the bolts.  New toilets generally come with plastic nuts and steel bolts.  The plastic nuts are nice because it is a pain to try and get corroded rusty pieces apart.  Put the new tank, not shown here, on the toilet, two nuts and bolts hold it on.  There is a rubber gasket that fits between them to prevent leaks.

Hooking up the new water supply to the bottom of the tank.  Make it tight but don't turn it so far that the float valve inside the tank is turned or twisted.


Putting the seat on the toilet. 

Turn on the water supply and watch the tank fill up.


Putting the new cover on the tank, almost done.


Invite Grandma in to check out the new toilet.  Remind her to "enjoy the go".